Tag: dataanalysts

  • How to Connect Power BI to Power Automate: Running DAX Queries

    How to Connect Power BI to Power Automate: Running DAX Queries

    In a world of AI, Fabric Apps and all fancy things popping up at the moment, I have a need to go a little more back to basics. So in the first part of a bit of a series of what I’m building at the moment, this is how to connect Power BI to Power Automate: Running DAX Queries.


    Power Automate gives us simple ways to connect into a semantic model and pull data, but how do you pull the data you actually need?


    Let’s start with connecting everything up and getting all the pre-reqs in place!

    Power BI Workspace

    First of all make sure you have a Power BI report (open still in PBI Desktop), uploaded into a workspace with a connected semantic model. You will also need to ensure the account you are going into Power Automate with has permissions into the workspace.

    • Power BI report uploaded to workspace
    • Connected semantic model
    • User account has permissions on the workspace
    • Have the Power BI report open in PBI Desktop

    PowerAutomate

    Now into Power Automate at:

    https://make.powerautomate.com

    • Into My Flows / New Flow
    • Then depending on choice the type (I have chosen Scheduled Cloud Flow)
    • Give your flow a name and if following my Scheduled Cloud Flow add in a Schedule
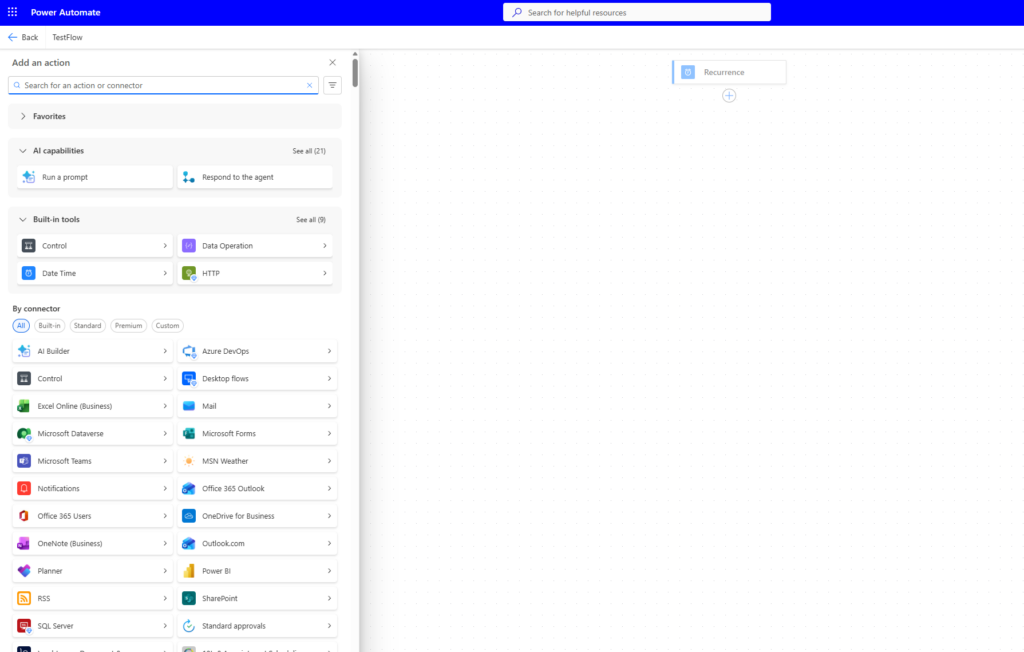
    • Select the Plus under Recurrence, which opens the Add an Action tab And search for “Power BI”

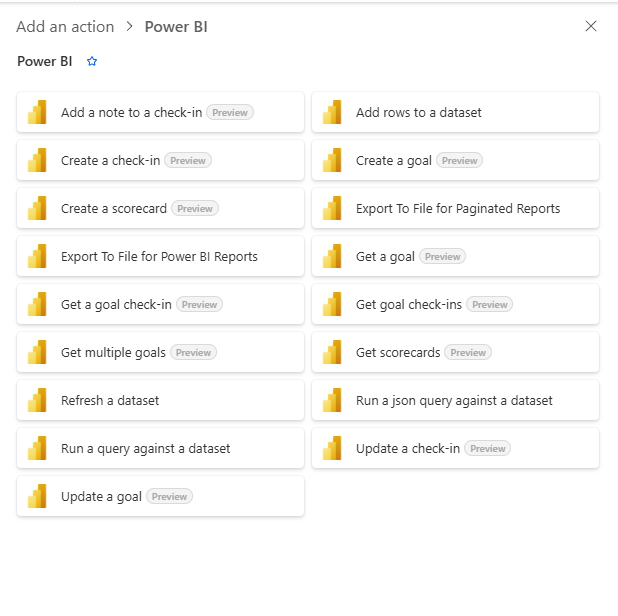
    Which should give you these options:

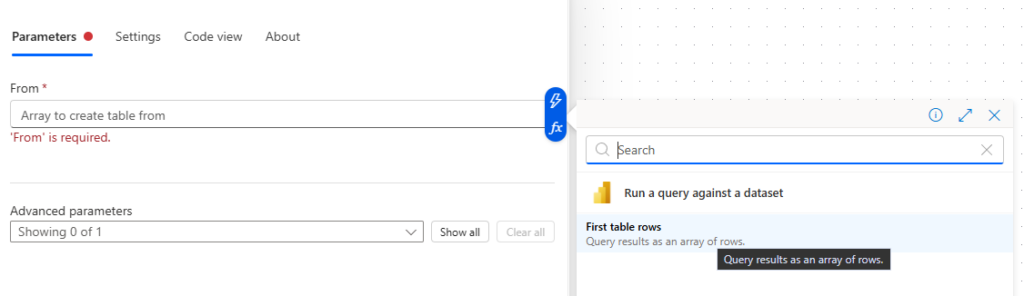
    The option we need here is:

    It will possibly ask you to sign in with an account (make sure to use one that has access to the Power BI workspace from earlier).

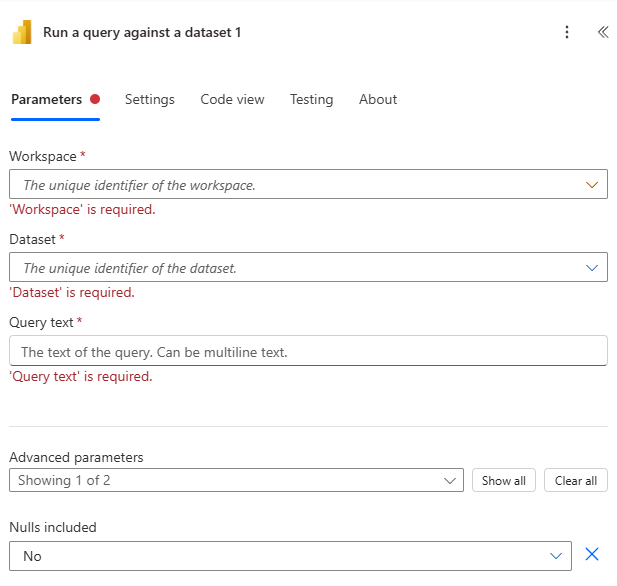
    This should now give you this!

    Next is as simple as choosing the Workspace and Dataset we want to use by using the various dropdowns. The main area we want to focus on is the Query Text.

    Back into PowerBI Desktop

    Best way now is to jump back into Power BI Desktop (make sure you have the same report open as what is uploaded to the workspace).

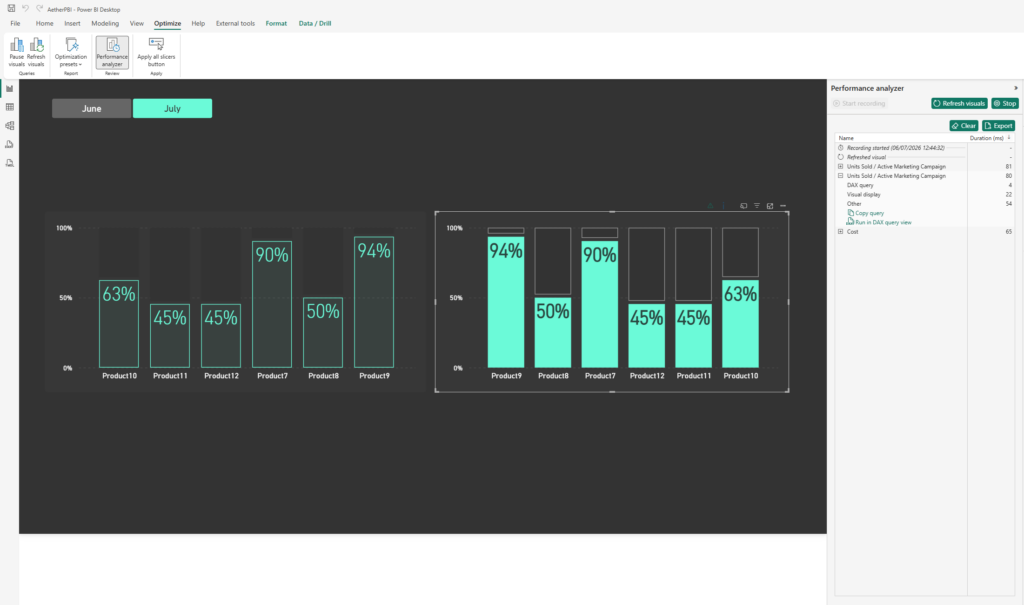
    • Open Optimize and then Performance Analyzer
    • Start Recording
    • Refresh Visuals
    • Select the visual we are wanting to export and you should see a Copy Query button / Run in DAX Query View

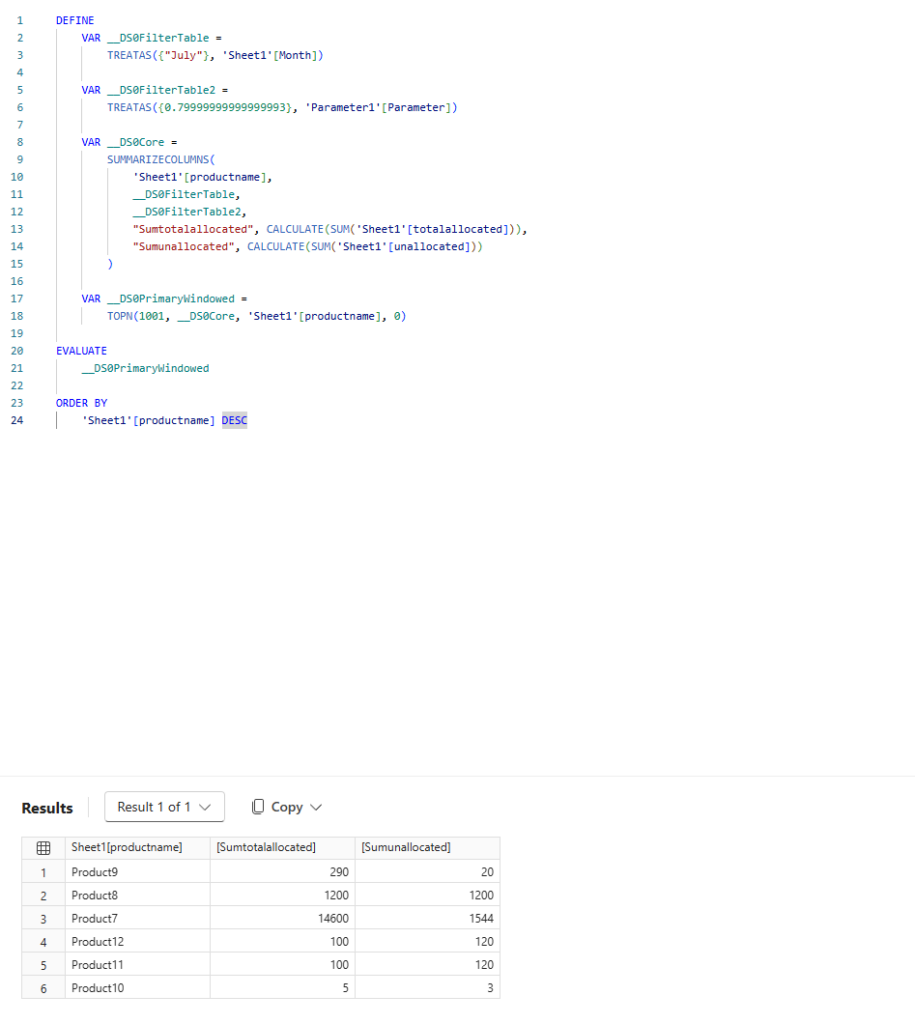
    Select “Run in DAX Query View” and you will be able to see the raw DAX and the output it produces. For example, in my test data I get the below:

    Now remember that Query Text field back in Power Automate? Copy the query from Power BI straight into that box!

    And there we go, we now have Power Automate running DAX queries against your model, ready to be used in a number of ways!

    A Bit Extra

    Let’s just add some extra actions so we can extract that data and test through an email!

    • Add a “Data Operations” action and then select Dynamic Content to add the data coming from Power BI.
    • Add a “Send an Email V2” action, and fill in some relevant details such as To, Subject. Select Body and again choose Dynamic Content, but this time the output from the Data Operation.

    Great! So let’s now save and test!

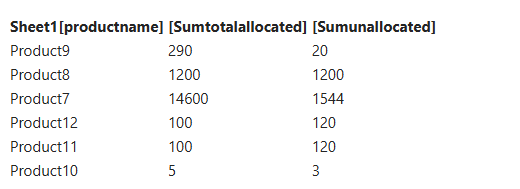
    Into Outlook, and here it is body of an email!

    Looks a little basic, but that’s a problem for another time!

    Thanks for reading through! Any questions, feel free to reach out!

    But this is going to form the basis for a number of things we can do, whether that’s Power Automate, Copilot Studio, AI actions

    Lots!

  • Add Animated Icons with Conditional Formatting

    Add Animated Icons with Conditional Formatting

    I use icons quite regularly as part of conditional formatting whether it’s to show change or highlight certain values. Working with Prism, some of those icons were custom-made. But what I didn’t realise until recently is that they don’t have to be static images.

    You can apply the same SVG animation techniques I’ve been experimenting with elsewhere, convert them to base64, and embed them directly into a Power BI theme!

    So, keep reading to learn how to add animated icons using Power BI’s conditional formatting.

    I began with a couple of static icons I’d previously built, converted them to SVG, and added a simple transform animation.

    Here’s an example SVG: a chevron that switches colours and moves left to right in a loop.

    <svg width="100" height="100" viewBox="0 0 100 100" xmlns="http://www.w3.org/2000/svg">
      <polyline points="40,30 60,50 40,70" fill="none" stroke="#ffffff" stroke-width="8" stroke-linecap="round" stroke-linejoin="round">
        <animateTransform 
          attributeName="transform" 
          type="translate" 
          values="-8 0;8 0;-8 0" 
          dur="2s" 
          repeatCount="indefinite" />
        <animate 
          attributeName="stroke" 
          values="#ffffff;#6bfad8;#ffffff" 
          dur="2s" 
          repeatCount="indefinite" />
      </polyline>
    </svg>


    I recommend using svgviewer.dev a brilliant tool I’ve mentioned in previous posts.

    • Paste your SVG code into the viewer to preview the animation.
    • Switch to the Data URI tab.
    • Copy the base64 output and it’s ready to use!

    Here’s the base64 version of the chevron above (copied here for convenience):

    data:image/svg+xml;base64,PHN2ZyB3aWR0aD0iMTAwIiBoZWlnaHQ9IjEwMCIgdmlld0JveD0iMCAwIDEwMCAxMDAiIHhtbG5zPSJodHRwOi8vd3d3LnczLm9yZy8yMDAwL3N2ZyI+CiAgPHBvbHlsaW5lIHBvaW50cz0iNDAsMzAgNjAsNTAgNDAsNzAiIGZpbGw9Im5vbmUiIHN0cm9rZT0iI2ZmZmZmZiIgc3Ryb2tlLXdpZHRoPSI4IiBzdHJva2UtbGluZWNhcD0icm91bmQiIHN0cm9rZS1saW5lam9pbj0icm91bmQiPgogICAgPGFuaW1hdGVUcmFuc2Zvcm0gCiAgICAgIGF0dHJpYnV0ZU5hbWU9InRyYW5zZm9ybSIgCiAgICAgIHR5cGU9InRyYW5zbGF0ZSIgCiAgICAgIHZhbHVlcz0iLTggMDs4IDA7LTggMCIgCiAgICAgIGR1cj0iMnMiIAogICAgICByZXBlYXRDb3VudD0iaW5kZWZpbml0ZSIgLz4KICAgIDxhbmltYXRlIAogICAgICBhdHRyaWJ1dGVOYW1lPSJzdHJva2UiIAogICAgICB2YWx1ZXM9IiNmZmZmZmY7IzZiZmFkODsjZmZmZmZmIiAKICAgICAgZHVyPSIycyIgCiAgICAgIHJlcGVhdENvdW50PSJpbmRlZmluaXRlIiAvPgogIDwvcG9seWxpbmU+Cjwvc3ZnPgo=

    Now let’s embed this into a Power BI theme. If you’re already using a custom theme, you can add to it, or create a new one. Here’s a basic example with several icons:

    {
      "name": "SVGTHEME",
      "icons": {
        "GreenChev": {
          "description": "GreenChev",
          "url": "data:image/svg+xml;base64,PHN2ZyB3aWR0aD0iMTAwIiBoZWlnaHQ9IjEwMCIgdmlld0JveD0iMCAwIDEwMCAxMDAiIHhtbG5zPSJodHRwOi8vd3d3LnczLm9yZy8yMDAwL3N2ZyI+CiAgPHBvbHlsaW5lIHBvaW50cz0iNDAsMzAgNjAsNTAgNDAsNzAiIGZpbGw9Im5vbmUiIHN0cm9rZT0iI2ZmZmZmZiIgc3Ryb2tlLXdpZHRoPSI4IiBzdHJva2UtbGluZWNhcD0icm91bmQiIHN0cm9rZS1saW5lam9pbj0icm91bmQiPgogICAgPGFuaW1hdGVUcmFuc2Zvcm0gYXR0cmlidXRlTmFtZT0idHJhbnNmb3JtIiB0eXBlPSJ0cmFuc2xhdGUiIHZhbHVlcz0iLTggMDs4IDA7LTggMCIgZHVyPSIycyIgcmVwZWF0Q291bnQ9ImluZGVmaW5pdGUiIC8+CiAgICA8YW5pbWF0ZSBhdHRyaWJ1dGVOYW1lPSJzdHJva2UiIHZhbHVlcz0iI2ZmZmZmZjsjNmJmYWQ4OyNmZmZmZmYiIGR1cj0iMnMiIHJlcGVhdENvdW50PSJpbmRlZmluaXRlIiAvPgogIDwvcG9seWxpbmU+Cjwvc3ZnPg=="
        },
        "PurpChev": {
          "description": "PurpChev",
          "url": "data:image/svg+xml;base64,PHN2ZyB3aWR0aD0iMTAwIiBoZWlnaHQ9IjEwMCIgdmlld0JveD0iMCAwIDEwMCAxMDAiIHhtbG5zPSJodHRwOi8vd3d3LnczLm9yZy8yMDAwL3N2ZyI+CiAgPHBvbHlsaW5lIHBvaW50cz0iNDAsMzAgNjAsNTAgNDAsNzAiIGZpbGw9Im5vbmUiIHN0cm9rZT0iI2ZmZmZmZiIgc3Ryb2tlLXdpZHRoPSI4IiBzdHJva2UtbGluZWNhcD0icm91bmQiIHN0cm9rZS1saW5lam9pbj0icm91bmQiPgogICAgPGFuaW1hdGVUcmFuc2Zvcm0gYXR0cmlidXRlTmFtZT0idHJhbnNmb3JtIiB0eXBlPSJ0cmFuc2xhdGUiIHZhbHVlcz0iLTggMDs4IDA7LTggMCIgZHVyPSIycyIgcmVwZWF0Q291bnQ9ImluZGVmaW5pdGUiIC8+CiAgICA8YW5pbWF0ZSBhdHRyaWJ1dGVOYW1lPSJzdHJva2UiIHZhbHVlcz0iI2ZmZmZmZjsjOWI1OWI2OyNmZmZmZmYiIGR1cj0iMnMiIHJlcGVhdENvdW50PSJpbmRlZmluaXRlIiAvPgogIDwvcG9seWxpbmU+Cjwvc3ZnPg=="
        },
        "Warn": {
          "description": "Warn",
          "url": "data:image/svg+xml;base64,PHN2ZyB2aWV3Qm94PSIwIDAgMTAwIDEwMCIgeG1sbnM9Imh0dHA6Ly93d3cudzMub3JnLzIwMDAvc3ZnIj4KICAgIDxzdHlsZT4KICAgICAgICAvKiBEZWZpbmUgdGhlIGFuaW1hdGlvbiBmb3IgdGhlIGV4Y2xhbWF0aW9uIG1hcmsgd2l0aGluIFNWRyBzdHlsZSAqLwogICAgICAgIC8qIE1vZGlmaWVkIGZvciBhIHNtb290aGVyIHB1bHNlIGVmZmVjdCAqLwogICAgICAgIEBrZXlmcmFtZXMgc3ZnUHVsc2UgewogICAgICAgICAgICAwJSB7CiAgICAgICAgICAgICAgICB0cmFuc2Zvcm06IHNjYWxlKDEpOwogICAgICAgICAgICAgICAgb3BhY2l0eTogMTsKICAgICAgICAgICAgfQogICAgICAgICAgICA1MCUgewogICAgICAgICAgICAgICAgdHJhbnNmb3JtOiBzY2FsZSgwLjkpOyAvKiBTbGlnaHRseSBsYXJnZXIgZm9yIGEgc3VidGxlIHB1bHNlICovCiAgICAgICAgICAgICAgICBvcGFjaXR5OiAwLjk7IC8qIFNsaWdodCBmYWRlIGZvciBhIHNvZnRlciBwdWxzZSAqLwogICAgICAgICAgICB9CiAgICAgICAgICAgIDEwMCUgewogICAgICAgICAgICAgICAgdHJhbnNmb3JtOiBzY2FsZSgxKTsKICAgICAgICAgICAgICAgIG9wYWNpdHk6IDE7CiAgICAgICAgICAgIH0KICAgICAgICB9CgogICAgICAgIC5zdmctZXhjbGFtYXRpb24tcGF0aCB7CiAgICAgICAgICAgIGZpbGw6ICNGQUYwQ0E7IC8qIFJlZCBjb2xvciBmb3IgdGhlIGV4Y2xhbWF0aW9uIG1hcmsgKi8KICAgICAgICAgICAgdHJhbnNmb3JtLW9yaWdpbjogNTBweCA1MHB4OyAvKiBDZW50ZXIgb2YgdGhlIHZpZXdCb3ggZm9yIHNjYWxpbmcgKi8KICAgICAgICAgICAgYW5pbWF0aW9uOiBzdmdQdWxzZSAxLjVzIGVhc2UtaW4tb3V0IGluZmluaXRlOyAvKiBBcHBseSB0aGUgbmV3IHB1bHNlIGFuaW1hdGlvbiAqLwogICAgICAgIH0KICAgIDwvc3R5bGU+CiAgICA8IS0tIEV4Y2xhbWF0aW9uIG1hcmsgYm9keSAtLT4KICAgIDxyZWN0IHg9IjQ1IiB5PSIxMCIgd2lkdGg9IjEwIiBoZWlnaHQ9IjYwIiByeD0iNSIgcnk9IjUiIGNsYXNzPSJzdmctZXhjbGFtYXRpb24tcGF0aCIgLz4KICAgIDwhLS0gRXhjbGFtYXRpb24gbWFyayBkb3QgLS0+CiAgICA8Y2lyY2xlIGN4PSI1MCIgY3k9Ijg1IiByPSI3IiBjbGFzcz0ic3ZnLWV4Y2xhbWF0aW9uLXBhdGgiIC8+Cjwvc3ZnPgo="
        },
        "Error": {
          "description": "Error",
          "url": "data:image/svg+xml;base64,PHN2ZyB2aWV3Qm94PSIwIDAgMTAwIDEwMCIgeG1sbnM9Imh0dHA6Ly93d3cudzMub3JnLzIwMDAvc3ZnIj4KICAgIDxzdHlsZT4KICAgICAgICAvKiBEZWZpbmUgdGhlIGFuaW1hdGlvbiBmb3IgdGhlIGNyb3NzIG1hcmsgKi8KICAgICAgICBAa2V5ZnJhbWVzIHN2Z1NoYWtlIHsKICAgICAgICAgICAgMCUgewogICAgICAgICAgICAgICAgdHJhbnNmb3JtOiByb3RhdGUoMGRlZyk7CiAgICAgICAgICAgIH0KICAgICAgICAgICAgMTAlIHsKICAgICAgICAgICAgICAgIHRyYW5zZm9ybTogcm90YXRlKC01ZGVnKTsgLyogUXVpY2sgcm90YXRpb24gdG8gdGhlIGxlZnQgKi8KICAgICAgICAgICAgfQogICAgICAgICAgICAyMCUgewogICAgICAgICAgICAgICAgdHJhbnNmb3JtOiByb3RhdGUoNWRlZyk7IC8qIFF1aWNrIHJvdGF0aW9uIHRvIHRoZSByaWdodCAqLwogICAgICAgICAgICB9CiAgICAgICAgICAgIDMwJSB7CiAgICAgICAgICAgICAgICB0cmFuc2Zvcm06IHJvdGF0ZSgwZGVnKTsgLyogUXVpY2sgcmV0dXJuIHRvIGNlbnRlciAqLwogICAgICAgICAgICB9CiAgICAgICAgICAgIC8qIEZyb20gMzAlIHRvIDEwMCUsIHRoZSBjcm9zcyByZW1haW5zIGF0IDAgZGVncmVlcywgY3JlYXRpbmcgYSBwYXVzZSAqLwogICAgICAgICAgICAxMDAlIHsKICAgICAgICAgICAgICAgIHRyYW5zZm9ybTogcm90YXRlKDBkZWcpOwogICAgICAgICAgICB9CiAgICAgICAgfQoKICAgICAgICAuc3ZnLWNyb3NzLXBhdGggewogICAgICAgICAgICBmaWxsOiAjZGMyNjI2OyAvKiBSZWQgY29sb3IgZm9yIHRoZSBjcm9zcyBtYXJrICovCiAgICAgICAgICAgIHRyYW5zZm9ybS1vcmlnaW46IDUwcHggNTBweDsgLyogQ2VudGVyIG9mIHRoZSB2aWV3Qm94IGZvciByb3RhdGlvbiAqLwogICAgICAgICAgICBhbmltYXRpb246IHN2Z1NoYWtlIDJzIGVhc2UtaW4tb3V0IGluZmluaXRlOyAvKiBBcHBseSB0aGUgc2hha2UgYW5pbWF0aW9uLCB3aXRoIGEgbG9uZ2VyIGR1cmF0aW9uIHRvIGFjY29tbW9kYXRlIHRoZSBwYXVzZSAqLwogICAgICAgIH0KICAgIDwvc3R5bGU+CiAgICA8IS0tIEdyb3VwIHRvIGFwcGx5IG92ZXJhbGwgcm90YXRpb24gdG8gdGhlIGNyb3NzIC0tPgogICAgPGcgdHJhbnNmb3JtPSJyb3RhdGUoNDUgNTAgNTApIj4KICAgICAgICA8IS0tIEZpcnN0IGxpbmUgb2YgdGhlIGNyb3NzIChpbml0aWFsbHkgdmVydGljYWwsIHJvdGF0ZWQgKzQ1IGRlZ3JlZXMpIC0tPgogICAgICAgIDxyZWN0IHg9IjQ1IiB5PSIxNSIgd2lkdGg9IjEwIiBoZWlnaHQ9IjcwIiByeD0iNSIgcnk9IjUiIHRyYW5zZm9ybT0icm90YXRlKDQ1IDUwIDUwKSIgY2xhc3M9InN2Zy1jcm9zcy1wYXRoIiAvPgogICAgICAgIDwhLS0gU2Vjb25kIGxpbmUgb2YgdGhlIGNyb3NzIChpbml0aWFsbHkgaG9yaXpvbnRhbCwgcm90YXRlZCAtNDUgZGVncmVlcykgLS0+CiAgICAgICAgPHJlY3QgeD0iMTUiIHk9IjQ1IiB3aWR0aD0iNzAiIGhlaWdodD0iMTAiIHJ4PSI1IiByeT0iNSIgdHJhbnNmb3JtPSJyb3RhdGUoLTQ1IDUwIDUwKSIgY2xhc3M9InN2Zy1jcm9zcy1wYXRoIiAvPgogICAgPC9nPgo8L3N2Zz4K"
        }
      }
    }
    

    Save this as a .json file, for example: svgicons.json.

    Each icon entry includes the below:

    • Name (What you want to refer to the icon as)
    • Description (A brief description of the Icon)
    • URL (The base64 of the icon)

    If you want to add additional icons, just load them in with the same format.

    Once you have the theme ready, we need to load it into PowerBI

    • Open Power BI Desktop.
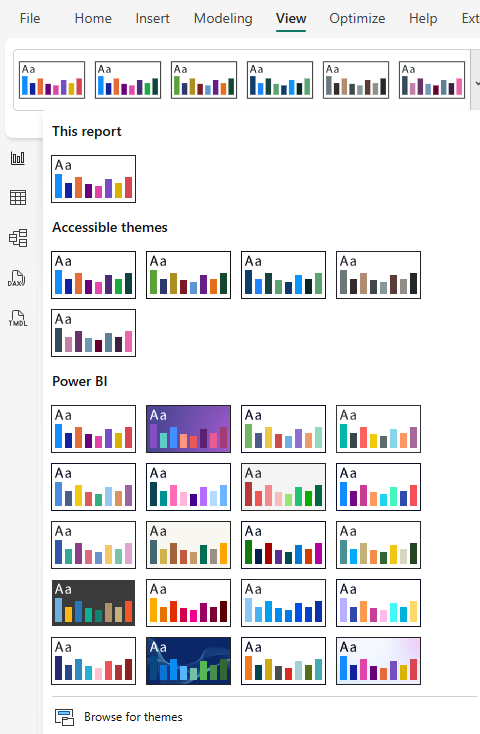
    • Go to the View tab → click the Themes dropdown → select Browse for themes.
    • Upload your .json file.

    Once the file is loaded in we have the icons ready to be used! So lets try it!

    • Select a column in your table or matrix.
    • Go to Conditional formatting → Icons.
    • Add your desired rules.
    • Scroll to the bottom of the icon list you’ll see your custom ones added from the theme.
      • Note: Previews won’t animate or show properly in the selection list so make sure your naming convention is clear!

    Once added in you should end up with something like the below:

    Here we have

    • Chevrons > (green and purple)
    • Warning ! with a pulse effect
    • Error X with a slight wobble effect

    I love finding new ways to enhance what Power BI can do natively especially when it unlocks more meaningful visualisations.

    Got questions or want to explore more ideas like this? Feel free to get in touch I’m always happy to help!

    Thanks for reading!!

  • Update PowerBI parameters with PowerShell

    Update PowerBI parameters with PowerShell

    Did you know that you can update PowerBI parameters with PowerShell across all reports in seconds?

    Managing Prism, I rely on parameters for version tracking as well as data sources, making things like infrastructure changes or performing updates much easier. However, managing this at scale meant manual changes was just going to take forever.

    Following on from last week’s blog, this post shows how we can automate updating PowerBI parameters with PowerShell.

    It’s so much faster!

    For example, if you have set a data source via a parameter or another field that may be consistent across your PowerBI solutions. This script will allow you to modify those parameters without having to update each one manually in the PowerBI service.

    This script has saved literal hours when deploying updates or infrastructure changes, allowing me to focus on what’s next rather than manually tweaking everything.

    Why Automate?

    Manually updating parameters across multiple PowerBI workspaces is very time consuming. Automation in this area ensures:

    • Faster updates when modifying reports and workspaces
    • Consistency of change across all reports
    • Less manual effort, freeing up time for the team

    How it works?

    The script:

    • Connects to the PowerBI Service
    • Define the parameter we want to set (change this as required)
    • Retrieves all PowerBI workspaces or choose to target those with specific IDs
    • Searches for reports starting with “Aether” (change to what you need)
    • Reads the parameters attached to a data set
    • Updates the parameter in the specified position / name (modify this as you need)
    Connect-PowerBIServiceAccount
    
    # Updates first parameter - parameter 0
    $UpdateParameter0 = "MyNewParameterValue"
    
    $workspaces = Get-PowerBIWorkspace -All
    
    foreach ($workspace in $workspaces) {
    
        # Get reports with names starting with "AETHER" in the current workspace
        $Reportlist = Get-PowerBIReport -WorkspaceId $workspace.Id | Where-Object { $_.Name -like 'AETHER*' }
    
        if ($Reportlist) {
            Write-Host "Workspace: $($workspace.Name)"
    
            foreach ($Report in $Reportlist) {
                Write-Host "  Report: $($Report.Name)"
    
                $JsonString = $null
    
                $ParametersJsonString = Invoke-PowerBIRestMethod -Url "https://api.powerbi.com/v1.0/myorg/groups/$($workspace.Id)/datasets/$($Report.DatasetId)/parameters" -Method Get
                $Parameters = (ConvertFrom-Json $ParametersJsonString).value
    
                $UpdateParameterList = @() # Initialize as an empty array
    
                foreach ($Parameter in $Parameters) {
                    $UpdateParameterList += @{ "name" = $Parameter.name; "newValue" = $Parameter.currentValue }
                }
    
                if ($UpdateParameterList.Count -gt 0) { #check if parameters exist.
                    $currentparam = $UpdateParameterList[0].newValue
    
                    Write-Host "    Current Parameter 0 Value: $currentparam"
    
                    if ($currentparam -ne $UpdateParameter0) {
                        Write-Host "Parameter 0 value does not match. Updating..."
    
                        $UpdateParameterList[0].newValue = $UpdateParameter0
                    }
                    else{
                        Write-Host "Parameter 0 value already matches. Skipping update."
                    }
    
                    $JsonBase = @{ "updateDetails" = $UpdateParameterList }
                    $JsonString = $JsonBase | ConvertTo-Json
    
                    # Update the parameters
                    Invoke-PowerBIRestMethod -Url "https://api.powerbi.com/v1.0/myorg/groups/$($workspace.Id)/datasets/$($Report.DatasetId)/Default.UpdateParameters" -Method Post -Body $JsonString
    
                    Start-Sleep -Seconds 5
    
                    # Refresh the data
                    Invoke-PowerBIRestMethod -Url "https://api.powerbi.com/v1.0/myorg/groups/$($workspace.Id)/datasets/$($Report.DatasetId)/refreshes" -Method Post
                    Write-Host "Refresh started."
                }
                else{
                    Write-Host "No parameters found for this dataset."
                }
            }
        } else {
          Write-Host "No reports found in workspace: $($workspace.Name)"
        }
    }
    Write-Host "Script completed."